10.1 Webサーバの設定 つづき
10.1.5 Apacheの制御
service/systemctl
SysVinit
# /etc/init.d/httpd startsystemd Red Hat系
# systemctl start httpdsystemd Debian系
# systemctl start apache2apachectl
apachectl status* httpd.service - The Apache HTTP Server
Loaded: loaded (/usr/lib/systemd/system/httpd.service; disabled; vendor preset: disabled)
Active: active (running) since Fri 2021-01-01 00:18:00 UTC; 3s ago
Docs: man:httpd(8)
man:apachectl(8)
Main PID: 1325 (httpd)
Status: "Processing requests..."
CGroup: /system.slice/httpd.service
|-1325 /usr/sbin/httpd -DFOREGROUND
|-1326 /usr/sbin/httpd -DFOREGROUND
|-1327 /usr/sbin/httpd -DFOREGROUND
|-1328 /usr/sbin/httpd -DFOREGROUND
|-1329 /usr/sbin/httpd -DFOREGROUND
`-1330 /usr/sbin/httpd -DFOREGROUND
Jan 01 00:17:59 lpic2-study-1 systemd[1]: Starting The Apache HTTP Server...
Jan 01 00:18:00 lpic2-study-1 systemd[1]: Started The Apache HTTP Server.systemctl status httpd● httpd.service - The Apache HTTP Server
Loaded: loaded (/usr/lib/systemd/system/httpd.service; disabled; vendor preset: disabled)
Active: active (running) since Fri 2021-01-01 00:18:00 UTC; 23s ago
Docs: man:httpd(8)
man:apachectl(8)
Main PID: 1325 (httpd)
Status: "Total requests: 0; Current requests/sec: 0; Current traffic: 0 B/sec"
CGroup: /system.slice/httpd.service
├─1325 /usr/sbin/httpd -DFOREGROUND
├─1326 /usr/sbin/httpd -DFOREGROUND
├─1327 /usr/sbin/httpd -DFOREGROUND
├─1328 /usr/sbin/httpd -DFOREGROUND
├─1329 /usr/sbin/httpd -DFOREGROUND
└─1330 /usr/sbin/httpd -DFOREGROUND
Jan 01 00:17:59 lpic2-study-1 systemd[1]: Starting The Apache HTTP Server...
Jan 01 00:18:00 lpic2-study-1 systemd[1]: Started The Apache HTTP Server.systemctlのラッパ:
- start
- stop
- restart
- reload
apachectl特有:
-
graceful
- Apacheを安全に再起動
- 停止中なら単に起動
- 稼働中なら、リクエストの処理を待って再起動
-
configtest
- 設定ファイルの構文チェック
httpd -tと同じ
10.1.6 モジュールの利用
httpd -l: 静的リンクされているモジュール一覧
httpd -lCompiled in modules:
core.c
mod_so.c
http_core.cmod_so.c: DSOモジュール読み込み機能
- DSO: Dynamic Shared Object. 要するに動的リンク
- これすらモジュールで実現されている
httpd -M: 静的/動的リンクされているモジュール一覧 + 設定ファイル構文チェック
httpd -MLoaded Modules:
core_module (static)
so_module (static)
http_module (static)
access_compat_module (shared)
actions_module (shared)
alias_module (shared)
...apxs
APache eXtenSion tool
Apacheインストール後にモジュールを組み込む
apxs-bash: apxs: command not foundyum provides apxsFailed to set locale, defaulting to C
Loaded plugins: fastestmirror
Loading mirror speeds from cached hostfile
* base: ty1.mirror.newmediaexpress.com
* epel: d2lzkl7pfhq30w.cloudfront.net
* extras: ty1.mirror.newmediaexpress.com
* updates: ty1.mirror.newmediaexpress.com
httpd-devel-2.4.6-95.el7.centos.x86_64 : Development interfaces for the Apache HTTP
: server
Repo : base
Matched from:
Filename : /usr/bin/apxs
httpd-devel-2.4.6-97.el7.centos.x86_64 : Development interfaces for the Apache HTTP
: server
Repo : updates
Matched from:
Filename : /usr/bin/apxshttpd-develパッケージでインストールされる
sudo yum install -y httpd-devel
which apxs/usr/bin/apxs【補】phpモジュールをインストールしてみる
PHPerのはしくれとして押さえておきたい
依存インストール
sudo yum -y install gcc libxml2-devel sqlite-develphpモジュール本体インストール
mkdir ~/tmp/
cd ~/tmp/

wget https://www.php.net/distributions/php-7.4.13.tar.gz
tar xzvf php-7.4.13.tar.gz
cd php-7.4.13

./configure --with-apxs2=$(which apxs)
make
sudo make install
内部的にたぶんこれを叩いている
sudo apxs -i -a -c mod_php7.c-i: DSOをinstallするの意-a: httpd.confにLoadModuleディレクティブを自動追加するの意-c: compilation operation
libphp7.soがインストールされ、httpd.confにLoadModuleディレクティブが追記された
...
chmod 755 /usr/lib64/httpd/modules/libphp7.so
[activating module `php7' in /etc/httpd/conf/httpd.conf]
...
sudo diff -u /etc/httpd/conf/httpd.conf.bak /etc/httpd/conf/httpd.conf--- /etc/httpd/conf/httpd.conf.bak 2021-01-01 03:09:47.471624330 +0000
+++ /etc/httpd/conf/httpd.conf 2021-01-01 03:09:47.473624461 +0000
@@ -71,6 +71,7 @@
#
# Example:
# LoadModule foo_module modules/mod_foo.so
+LoadModule php7_module /usr/lib64/httpd/modules/libphp7.so
#
Include conf.modules.d/*.confさらにphpファイルとして実行すべきファイルパスパターンを指定
+<FilesMatch \.php$>
+  SetHandler application/x-httpd-php
+</FilesMatch>
設定反映
sudo apachectl restart

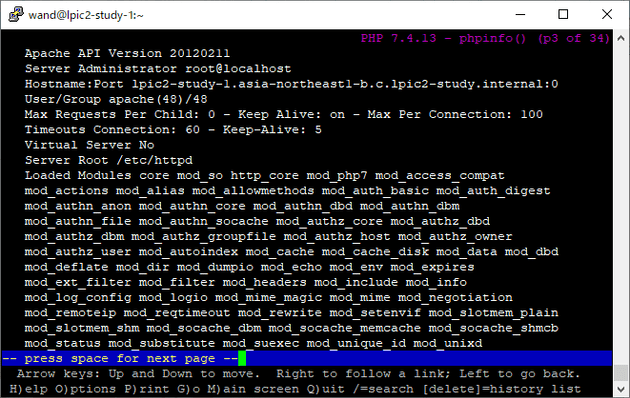
httpd -M | grep phpphp7_moduleDSOがロードされた
php7_module (shared)いつものを表示
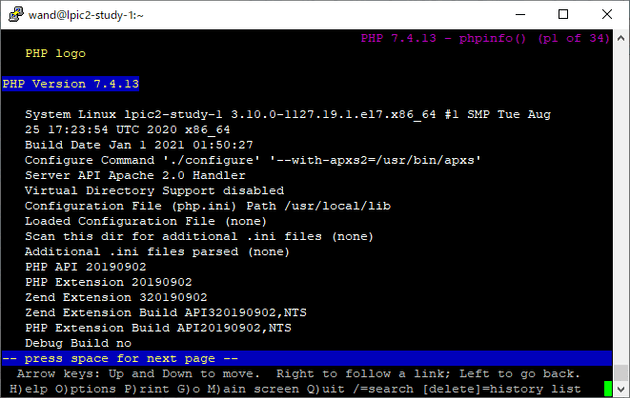
echo '<?php phpinfo(); ?>'  | sudo tee /var/www/html/index.php
lynx localhost/index.php
a2enmod/a2dismod
Debian系で使える
引数で指定のモジュール有効化/無効化
引数なしでa2enmodを実行した場合、利用可能なモジュール確認・対話的にモジュール有効化
10.1.7 クライアントアクセスの認証
基本認証
平文パスワード
SSL/TLSによる経路暗号化は別途必須
sudo diff -u /etc/httpd/conf/httpd.conf.bak /etc/httpd/conf/httpd.conf--- /etc/httpd/conf/httpd.conf.bak 2021-01-01 04:17:21.942865866 +0000
+++ /etc/httpd/conf/httpd.conf 2021-01-01 04:19:37.099678526 +0000
@@ -374,6 +374,12 @@
ServerTokens Prod
+<Directory "/var/www/html/private-area">
+ AuthType Basic
+ AuthName "Please Enter Your ID and Password!"
+ AuthUserFile /etc/httpd/conf/htpasswd
+ Require valid-user
+</Directory>
# Supplemental configuration
#
# Load config files in the "/etc/httpd/conf.d" directory, if any.アクセス制限下におくドキュメント配置
sudo mkdir /var/www/html/private-area/
echo 'private' | sudo tee /var/www/html/private-area/index.html
ユーザ登録: htpasswdコマンド
-c: create — htpasswdファイル作成-m: MD5ハッシュ (2.2.18以降のデフォルト)-s: SHA-1ハッシュ-D: ユーザ削除
sudo htpasswd -c /etc/httpd/conf/htpasswd wandNew password: wand
Re-type new password: wand
Adding password for user wandcat /etc/httpd/conf/htpasswdwand:$apr1$ifKfDDb6$52cO6A4VX2OLh2cZKC.3I0接頭辞 $apr1$がmd5のしるし
反映するには、reloadではなくrestart必要っぽい
sudo apachectl restart

curl localhost/private-area/
<!DOCTYPE HTML PUBLIC "-//IETF//DTD HTML 2.0//EN">
<html><head>
<title>401 Unauthorized</title>
</head><body>
<h1>Unauthorized</h1>
<p>This server could not verify that you
are authorized to access the document
requested. Either you supplied the wrong
credentials (e.g., bad password), or your
browser doesn't understand how to supply
the credentials required.</p>
</body></html>Basic認証通す
curl --basic --user "wand:wand" http://localhost/private-area/privateOK
ダイジェスト認証
チャレンジ・レスポンス形式
盗聴されてもただちにパスワードが漏洩するということはない
設定
+<Directory "/var/www/html/secret-area">
+  AuthType Digest
+  AuthName "secret-area"
+  AuthUserFile /etc/httpd/conf/htdigestfile
+  Require valid-user
+</Directory>
+
+<Directory "/var/www/html/another-secret-area">
+  AuthType Digest
+  AuthName "another-secret-area"
+  AuthUserFile /etc/httpd/conf/htdigestfile
+  Require valid-user
+</Directory>
Basic認証と異なり、AuthNameにはrealmを指定する
sudo htdigest -c /etc/httpd/conf/htdigestfile secret-area wandAdding password for wand in realm secret-area.
New password: wand
Re-type new password: wandドキュメント配置
sudo mkdir /var/www/html/secret-area
sudo mkdir /var/www/html/another-secret-area
echo secret | sudo tee /var/www/html/secret-area/index.html
echo another-secret | sudo tee /var/www/html/another-secret-area/index.html
設定反映・動作確認
apachectl configtest
sudo apachectl restart

curl http://localhost/secret-area/
<!DOCTYPE HTML PUBLIC "-//IETF//DTD HTML 2.0//EN">
<html><head>
<title>401 Unauthorized</title>
</head><body>
<h1>Unauthorized</h1>
<p>This server could not verify that you
are authorized to access the document
requested. Either you supplied the wrong
credentials (e.g., bad password), or your
browser doesn't understand how to supply
the credentials required.</p>
</body></html>Digest認証通す
curl --digest --user "wand:wand" http://localhost/secret-area/secretOK
ユーザ名パスワードが合っていても別のrealmだと401
curl --digest --user "wand:wand" http://localhost/another-secret-area/<!DOCTYPE HTML PUBLIC "-//IETF//DTD HTML 2.0//EN">
<html><head>
<title>401 Unauthorized</title>
</head><body>
<h1>Unauthorized</h1>
<p>This server could not verify that you
are authorized to access the document
requested. Either you supplied the wrong
credentials (e.g., bad password), or your
browser doesn't understand how to supply
the credentials required.</p>
</body></html>ホストベースのアクセス制御(1)
Order,Allow,DenyディレクティブによるIPアドレス・ホスト名ベースのアクセスコントロールを行う
mod_access_compatモジュールの機能- 非推奨
httpd -M | grep -e access_compat_module一応デフォルト有効になってる…
access_compat_module (shared)例1
Order allow,deny
Allow from all
Deny from 172.31.0.0/16- 原則すべてのアクセス許可
- 例外的に172.31.0.0/16からのアクセスは拒否
例2
Order deny,allow
Deny from 172.31.0.0/16
Allow from 172.31.0.1- 172.31.0.0/16からのアクセスは原則拒否
- 例外的に 172.31.0.1 からのアクセスは許可
- 他のアクセスは許可
ホストベースのアクセス制御(2)
authz_host_moduleモジュールの機能
- Requireディレクティブ
- Apache2.4ではこちら推奨
httpd -M | grep -e authz_host_module authz_host_module (shared)例
Require all granted
Require not ip 172.31- 原則すべてのアクセス許可
- 例外的に172.31.0.0/16からのアクセスは拒否
10.1.8 バーチャルホスト
1台のサーバで複数のWebサイトを管理
名前ベースのバーチャルホスト
1つのIPアドレス・ポート番号に対して複数のドメイン名を割り当てる
IPベースのバーチャルホスト
複数のIPアドレス・ポート番号を使用
サンプル
IP設定
sudo ifconfig eth0:0 192.168.1.1
sudo ifconfig eth0:1 192.168.1.2
名前設定
- 実際にはDNSを使うことになるがひとまず手っ取り早く
/etc/hosts
cat /etc/hosts192.168.1.1 www1.example.com www2.example.com
192.168.1.2 www3.example.com疎通確認
ping -c 1 www1.example.com
ping -c 1 www2.example.com
ping -c 1 www3.example.com
PING www1.example.com (192.168.1.1) 56(84) bytes of data.
64 bytes from www1.example.com (192.168.1.1): icmp_seq=1 ttl=64 time=0.053 ms
--- www1.example.com ping statistics ---
1 packets transmitted, 1 received, 0% packet loss, time 0ms
rtt min/avg/max/mdev = 0.053/0.053/0.053/0.000 ms
PING www1.example.com (192.168.1.1) 56(84) bytes of data.
64 bytes from www1.example.com (192.168.1.1): icmp_seq=1 ttl=64 time=0.045 ms
--- www1.example.com ping statistics ---
1 packets transmitted, 1 received, 0% packet loss, time 0ms
rtt min/avg/max/mdev = 0.045/0.045/0.045/0.000 ms
PING www3.example.com (192.168.1.2) 56(84) bytes of data.
64 bytes from www3.example.com (192.168.1.2): icmp_seq=1 ttl=64 time=0.038 ms
--- www3.example.com ping statistics ---
1 packets transmitted, 1 received, 0% packet loss, time 0ms
rtt min/avg/max/mdev = 0.038/0.038/0.038/0.000 msVirtualHost設定
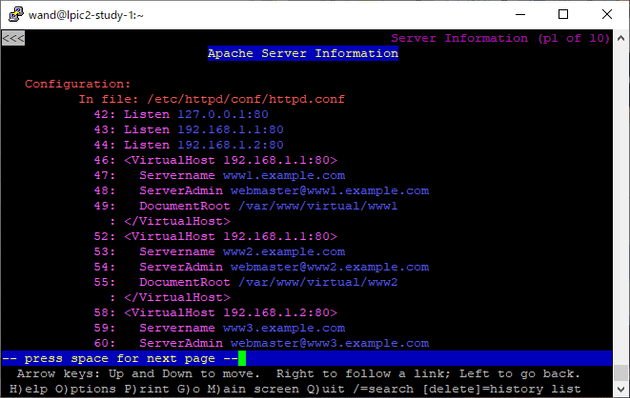
sudo diff -u /etc/httpd/conf/httpd.conf.bak /etc/httpd/conf/httpd.conf--- /etc/httpd/conf/httpd.conf.bak 2021-01-01 03:00:21.050691856 +0000
+++ /etc/httpd/conf/httpd.conf 2021-01-01 02:53:03.448158758 +0000
@@ -39,7 +39,26 @@
# prevent Apache from glomming onto all bound IP addresses.
#
#Listen 12.34.56.78:80
-Listen 80
+Listen 192.168.1.1:80
+Listen 192.168.1.2:80
+
+<VirtualHost 192.168.1.1:80>
+ Servername www1.example.com
+ ServerAdmin webmaster@www1.example.com
+ DocumentRoot /var/www/virtual/www1
+</VirtualHost>
+
+<VirtualHost 192.168.1.1:80>
+ Servername www2.example.com
+ ServerAdmin webmaster@www2.example.com
+ DocumentRoot /var/www/virtual/www2
+</VirtualHost>
+
+<VirtualHost 192.168.1.2:80>
+ Servername www3.example.com
+ ServerAdmin webmaster@www3.example.com
+ DocumentRoot /var/www/virtual/www3
+</VirtualHost>
#
# Dynamic Shared Object (DSO) Supportコンフィグ書式確認
apachectl configtestドキュメントルートのディレクトリが無いぞと警告してくれる。優しい
AH00112: Warning: DocumentRoot [/var/www/virtual/www1] does not exist
AH00112: Warning: DocumentRoot [/var/www/virtual/www2] does not exist
AH00112: Warning: DocumentRoot [/var/www/virtual/www3] does not exist
Syntax OK
ドキュメント配置
sudo mkdir -p /var/www/virtual/www{1,2,3}/
echo www1 | sudo tee /var/www/virtual/www1/index.html
echo www2 | sudo tee /var/www/virtual/www2/index.html
echo www3 | sudo tee /var/www/virtual/www3/index.html
再度確認
apachectl configtestSyntax OK設定反映してcurlしてみる
sudo apachectl restart

curl http://www1.example.com
curl http://www2.example.com
curl http://www3.example.com
www1
www2
www3それぞれのWebサイトを独立して運用できた
10.1.9 SSL/TLS
ssl_module(mod_ssl.so)導入
httpd -M | grep ssl(空)ないのでインストール・ロードする
yum provides mod_sslFailed to set locale, defaulting to C
Loaded plugins: fastestmirror
Loading mirror speeds from cached hostfile
* base: ty1.mirror.newmediaexpress.com
* epel: d2lzkl7pfhq30w.cloudfront.net
* extras: ty1.mirror.newmediaexpress.com
* updates: ty1.mirror.newmediaexpress.com
1:mod_ssl-2.4.6-95.el7.centos.x86_64 : SSL/TLS module for the Apache HTTP Server
Repo : base
1:mod_ssl-2.4.6-97.el7.centos.x86_64 : SSL/TLS module for the Apache HTTP Server
Repo : updatessudo yum -y install mod_ssl設定ファイルも作ってくれる
ls -l /etc/httpd/conf.d
ls -l /etc/httpd/conf.modules.d/
total 32
-rw-r--r--. 1 root root 366 Nov 16 16:19 README
-rw-r--r--. 1 root root 2926 Nov 16 16:18 autoindex.conf
+ -rw-r--r--. 1 root root 9443 Nov 16 14:44 ssl.conf
-rw-r--r--. 1 root root 1253 Dec 31 07:04 userdir.conf
-rw-r--r--. 1 root root 1252 Dec 31 07:03 userdir.conf.bak
-rw-r--r--. 1 root root 824 Nov 16 14:44 welcome.conf
total 32
-rw-r--r--. 1 root root 3739 Nov 16 14:44 00-base.conf
-rw-r--r--. 1 root root 139 Nov 16 14:44 00-dav.conf
-rw-r--r--. 1 root root 41 Nov 16 14:44 00-lua.conf
-rw-r--r--. 1 root root 742 Nov 16 14:44 00-mpm.conf
-rw-r--r--. 1 root root 957 Nov 16 14:44 00-proxy.conf
+ -rw-r--r--. 1 root root 41 Nov 16 14:44 00-ssl.conf
-rw-r--r--. 1 root root 88 Nov 16 14:44 00-systemd.conf
-rw-r--r--. 1 root root 451 Nov 16 14:44 01-cgi.confcat /etc/httpd/conf.modules.d/00-ssl.confLoadModule ssl_module modules/mod_ssl.socat /etc/httpd/conf.d/ssl.conf#
# When we also provide SSL we have to listen to the
# the HTTPS port in addition.
#
Listen 443 https
##
## SSL Global Context
##
## All SSL configuration in this context applies both to
## the main server and all SSL-enabled virtual hosts.
##
# Pass Phrase Dialog:
# Configure the pass phrase gathering process.
# The filtering dialog program (`builtin' is a internal
# terminal dialog) has to provide the pass phrase on stdout.
SSLPassPhraseDialog exec:/usr/libexec/httpd-ssl-pass-dialog
# Inter-Process Session Cache:
# Configure the SSL Session Cache: First the mechanism
# to use and second the expiring timeout (in seconds).
SSLSessionCache shmcb:/run/httpd/sslcache(512000)
SSLSessionCacheTimeout 300
# Pseudo Random Number Generator (PRNG):
# Configure one or more sources to seed the PRNG of the
# SSL library. The seed data should be of good random quality.
# WARNING! On some platforms /dev/random blocks if not enough entropy
# is available. This means you then cannot use the /dev/random device
# because it would lead to very long connection times (as long as
# it requires to make more entropy available). But usually those
# platforms additionally provide a /dev/urandom device which doesn't
# block. So, if available, use this one instead. Read the mod_ssl User
# Manual for more details.
SSLRandomSeed startup file:/dev/urandom 256
SSLRandomSeed connect builtin
#SSLRandomSeed startup file:/dev/random 512
#SSLRandomSeed connect file:/dev/random 512
#SSLRandomSeed connect file:/dev/urandom 512
#
# Use "SSLCryptoDevice" to enable any supported hardware
# accelerators. Use "openssl engine -v" to list supported
# engine names. NOTE: If you enable an accelerator and the
# server does not start, consult the error logs and ensure
# your accelerator is functioning properly.
#
SSLCryptoDevice builtin
#SSLCryptoDevice ubsec
##
## SSL Virtual Host Context
##
<VirtualHost _default_:443>
# General setup for the virtual host, inherited from global configuration
#DocumentRoot "/var/www/html"
#ServerName www.example.com:443
# Use separate log files for the SSL virtual host; note that LogLevel
# is not inherited from httpd.conf.
ErrorLog logs/ssl_error_log
TransferLog logs/ssl_access_log
LogLevel warn
# SSL Engine Switch:
# Enable/Disable SSL for this virtual host.
SSLEngine on
# SSL Protocol support:
# List the enable protocol levels with which clients will be able to
# connect. Disable SSLv2 access by default:
SSLProtocol all -SSLv2 -SSLv3
# SSL Cipher Suite:
# List the ciphers that the client is permitted to negotiate.
# See the mod_ssl documentation for a complete list.
SSLCipherSuite HIGH:3DES:!aNULL:!MD5:!SEED:!IDEA
# Speed-optimized SSL Cipher configuration:
# If speed is your main concern (on busy HTTPS servers e.g.),
# you might want to force clients to specific, performance
# optimized ciphers. In this case, prepend those ciphers
# to the SSLCipherSuite list, and enable SSLHonorCipherOrder.
# Caveat: by giving precedence to RC4-SHA and AES128-SHA
# (as in the example below), most connections will no longer
# have perfect forward secrecy - if the server's key is
# compromised, captures of past or future traffic must be
# considered compromised, too.
#SSLCipherSuite RC4-SHA:AES128-SHA:HIGH:MEDIUM:!aNULL:!MD5
#SSLHonorCipherOrder on
# Server Certificate:
# Point SSLCertificateFile at a PEM encoded certificate. If
# the certificate is encrypted, then you will be prompted for a
# pass phrase. Note that a kill -HUP will prompt again. A new
# certificate can be generated using the genkey(1) command.
SSLCertificateFile /etc/pki/tls/certs/localhost.crt
# Server Private Key:
# If the key is not combined with the certificate, use this
# directive to point at the key file. Keep in mind that if
# you've both a RSA and a DSA private key you can configure
# both in parallel (to also allow the use of DSA ciphers, etc.)
SSLCertificateKeyFile /etc/pki/tls/private/localhost.key
# Server Certificate Chain:
# Point SSLCertificateChainFile at a file containing the
# concatenation of PEM encoded CA certificates which form the
# certificate chain for the server certificate. Alternatively
# the referenced file can be the same as SSLCertificateFile
# when the CA certificates are directly appended to the server
# certificate for convinience.
#SSLCertificateChainFile /etc/pki/tls/certs/server-chain.crt
# Certificate Authority (CA):
# Set the CA certificate verification path where to find CA
# certificates for client authentication or alternatively one
# huge file containing all of them (file must be PEM encoded)
#SSLCACertificateFile /etc/pki/tls/certs/ca-bundle.crt
# Client Authentication (Type):
# Client certificate verification type and depth. Types are
# none, optional, require and optional_no_ca. Depth is a
# number which specifies how deeply to verify the certificate
# issuer chain before deciding the certificate is not valid.
#SSLVerifyClient require
#SSLVerifyDepth 10
# Access Control:
# With SSLRequire you can do per-directory access control based
# on arbitrary complex boolean expressions containing server
# variable checks and other lookup directives. The syntax is a
# mixture between C and Perl. See the mod_ssl documentation
# for more details.
#<Location />
#SSLRequire ( %{SSL_CIPHER} !~ m/^(EXP|NULL)/ \
# and %{SSL_CLIENT_S_DN_O} eq "Snake Oil, Ltd." \
# and %{SSL_CLIENT_S_DN_OU} in {"Staff", "CA", "Dev"} \
# and %{TIME_WDAY} >= 1 and %{TIME_WDAY} <= 5 \
# and %{TIME_HOUR} >= 8 and %{TIME_HOUR} <= 20 ) \
# or %{REMOTE_ADDR} =~ m/^192\.76\.162\.[0-9]+$/
#</Location>
# SSL Engine Options:
# Set various options for the SSL engine.
# o FakeBasicAuth:
# Translate the client X.509 into a Basic Authorisation. This means that
# the standard Auth/DBMAuth methods can be used for access control. The
# user name is the `one line' version of the client's X.509 certificate.
# Note that no password is obtained from the user. Every entry in the user
# file needs this password: `xxj31ZMTZzkVA'.
# o ExportCertData:
# This exports two additional environment variables: SSL_CLIENT_CERT and
# SSL_SERVER_CERT. These contain the PEM-encoded certificates of the
# server (always existing) and the client (only existing when client
# authentication is used). This can be used to import the certificates
# into CGI scripts.
# o StdEnvVars:
# This exports the standard SSL/TLS related `SSL_*' environment variables.
# Per default this exportation is switched off for performance reasons,
# because the extraction step is an expensive operation and is usually
# useless for serving static content. So one usually enables the
# exportation for CGI and SSI requests only.
# o StrictRequire:
# This denies access when "SSLRequireSSL" or "SSLRequire" applied even
# under a "Satisfy any" situation, i.e. when it applies access is denied
# and no other module can change it.
# o OptRenegotiate:
# This enables optimized SSL connection renegotiation handling when SSL
# directives are used in per-directory context.
#SSLOptions +FakeBasicAuth +ExportCertData +StrictRequire
<Files ~ "\.(cgi|shtml|phtml|php3?)$">
SSLOptions +StdEnvVars
</Files>
<Directory "/var/www/cgi-bin">
SSLOptions +StdEnvVars
</Directory>
# SSL Protocol Adjustments:
# The safe and default but still SSL/TLS standard compliant shutdown
# approach is that mod_ssl sends the close notify alert but doesn't wait for
# the close notify alert from client. When you need a different shutdown
# approach you can use one of the following variables:
# o ssl-unclean-shutdown:
# This forces an unclean shutdown when the connection is closed, i.e. no
# SSL close notify alert is send or allowed to received. This violates
# the SSL/TLS standard but is needed for some brain-dead browsers. Use
# this when you receive I/O errors because of the standard approach where
# mod_ssl sends the close notify alert.
# o ssl-accurate-shutdown:
# This forces an accurate shutdown when the connection is closed, i.e. a
# SSL close notify alert is send and mod_ssl waits for the close notify
# alert of the client. This is 100% SSL/TLS standard compliant, but in
# practice often causes hanging connections with brain-dead browsers. Use
# this only for browsers where you know that their SSL implementation
# works correctly.
# Notice: Most problems of broken clients are also related to the HTTP
# keep-alive facility, so you usually additionally want to disable
# keep-alive for those clients, too. Use variable "nokeepalive" for this.
# Similarly, one has to force some clients to use HTTP/1.0 to workaround
# their broken HTTP/1.1 implementation. Use variables "downgrade-1.0" and
# "force-response-1.0" for this.
BrowserMatch "MSIE [2-5]" \
nokeepalive ssl-unclean-shutdown \
downgrade-1.0 force-response-1.0
# Per-Server Logging:
# The home of a custom SSL log file. Use this when you want a
# compact non-error SSL logfile on a virtual host basis.
CustomLog logs/ssl_request_log \
"%t %h %{SSL_PROTOCOL}x %{SSL_CIPHER}x \"%r\" %b"
</VirtualHost> 設定反映
apachectl configtest
sudo apachectl restart

httpd -M | grep ssl
ssl_module (shared)認証局作成
sudo /etc/pki/tls/misc/CA -newcaCA certificate filename (or enter to create)
Making CA certificate ...
Generating a 2048 bit RSA private key
..............................................................................................................+++
.....................+++
writing new private key to '/etc/pki/CA/private/./cakey.pem'
Enter PEM pass phrase:
Verifying - Enter PEM pass phrase:
-----
You are about to be asked to enter information that will be incorporated
into your certificate request.
What you are about to enter is what is called a Distinguished Name or a DN.
There are quite a few fields but you can leave some blank
For some fields there will be a default value,
If you enter '.', the field will be left blank.
-----
Country Name (2 letter code) [XX]:JP
JP
State or Province Name (full name) []:Tokyo
Tokyo
Locality Name (eg, city) [Default City]:Akihabara
Akihabara
Organization Name (eg, company) [Default Company Ltd]:Example Corp
Example Corp
Organizational Unit Name (eg, section) []:Network
Network
Common Name (eg, your name or your server's hostname) []:www1.example.com
www1.example.com
Email Address []:info@example.com
info@example.com
Please enter the following 'extra' attributes
to be sent with your certificate request
A challenge password []:
An optional company name []:
Using configuration from /etc/pki/tls/openssl.cnf
Enter pass phrase for /etc/pki/CA/private/./cakey.pem:
Check that the request matches the signature
Signature ok
Certificate Details:
Serial Number:
84:29:49:5d:b2:93:a4:7a
Validity
Not Before: Jan 1 05:36:02 2021 GMT
Not After : Jan 1 05:36:02 2024 GMT
Subject:
countryName = JP
stateOrProvinceName = Tokyo
organizationName = Example Corp
organizationalUnitName = Network
commonName = www1.example.com
emailAddress = info@example.com
X509v3 extensions:
X509v3 Subject Key Identifier:
C7:6D:B2:73:49:BA:04:AB:2D:C8:87:F2:63:EE:3A:2C:DD:05:18:53
X509v3 Authority Key Identifier:
keyid:C7:6D:B2:73:49:BA:04:AB:2D:C8:87:F2:63:EE:3A:2C:DD:05:18:53
X509v3 Basic Constraints:
CA:TRUE
Certificate is to be certified until Jan 1 05:36:02 2024 GMT (1095 days)
Write out database with 1 new entries
Data Base Updated/etc/pki/CA/private/cakey.pemに秘密鍵ができる
sudo ls -ld /etc/pki/CA/privatedrwx------. 2 root root 23 Jan 1 05:33 /etc/pki/CA/privatesudo ls -l /etc/pki/CA/private/cakey.pem-rw-r--r--. 1 root root 1834 Jan 1 05:35 cakey.pem/etc/pki/CA/cacert.pemに自己署名証明書ができる
ls -l /etc/pki/CA/cacert.pem-rw-r--r--. 1 root root 4527 Jan 1 05:36 /etc/pki/CA/cacert.pemサーバ秘密鍵作成
以下、/etc/pki/CA/で作業
$ sudo -i
# cd /etc/pki/CA/

# openssl genrsa -out server.key 2048
Generating RSA private key, 2048 bit long modulus
...................................................+++
.+++
e is 65537 (0x10001)証明書発行要求書(CSR)生成
# openssl req -new -key server.key -out server.csrYou are about to be asked to enter information that will be incorporated
into your certificate request.
What you are about to enter is what is called a Distinguished Name or a DN.
There are quite a few fields but you can leave some blank
For some fields there will be a default value,
If you enter '.', the field will be left blank.
-----
Country Name (2 letter code) [XX]:JP
State or Province Name (full name) []:Tokyo
Locality Name (eg, city) [Default City]:Akihabara
Organization Name (eg, company) [Default Company Ltd]:Example Corp
Organizational Unit Name (eg, section) []:Network
Common Name (eg, your name or your server's hostname) []:www1.example.com
Email Address []:info@example.com
Please enter the following 'extra' attributes
to be sent with your certificate request
A challenge password []:
An optional company name []:自己署名証明書発行
# openssl ca -out server.crt -infiles /etc/pki/CA/server.csrUsing configuration from /etc/pki/tls/openssl.cnf
Enter pass phrase for /etc/pki/CA/private/cakey.pem:
Check that the request matches the signature
Signature ok
Certificate Details:
Serial Number:
84:29:49:5d:b2:93:a4:7b
Validity
Not Before: Jan 1 05:58:40 2021 GMT
Not After : Jan 1 05:58:40 2022 GMT
Subject:
countryName = JP
stateOrProvinceName = Tokyo
organizationName = Example Corp
organizationalUnitName = Network
commonName = www1.example.com
emailAddress = info@example.com
X509v3 extensions:
X509v3 Basic Constraints:
CA:FALSE
Netscape Comment:
OpenSSL Generated Certificate
X509v3 Subject Key Identifier:
FD:B0:40:61:96:53:ED:C0:FC:3F:7A:89:4D:1B:D3:9E:81:5C:B5:87
X509v3 Authority Key Identifier:
keyid:C7:6D:B2:73:49:BA:04:AB:2D:C8:87:F2:63:EE:3A:2C:DD:05:18:53
Certificate is to be certified until Jan 1 05:58:40 2022 GMT (365 days)
Sign the certificate? [y/n]:y
1 out of 1 certificate requests certified, commit? [y/n]y
Write out database with 1 new entries
Data Base Updatedサーバ証明書配置
# mkdir /etc/httpd/conf/ssl.crt/ /etc/httpd/conf/ssl.key/
# mv server.crt /etc/httpd/conf/ssl.crt/
# mv server.key /etc/httpd/conf/ssl.key/
設定ファイルでサーバ証明書・サーバ秘密鍵の場所を設定
--- /etc/httpd/conf.d/ssl.conf.bak	2021-01-01 06:01:43.640932052 +0000
+++ /etc/httpd/conf.d/ssl.conf	2021-01-01 06:09:52.429744401 +0000
@@ -56,6 +56,8 @@
 <VirtualHost _default_:443>

 # General setup for the virtual host, inherited from global configuration
 #DocumentRoot "/var/www/html"
 #ServerName www.example.com:443
+DocumentRoot "/var/www/html"
+ServerName www1.example.com:443

@@ -97,14 +99,16 @@
 # the certificate is encrypted, then you will be prompted for a
 # pass phrase.  Note that a kill -HUP will prompt again.  A new
 # certificate can be generated using the genkey(1) command.
-SSLCertificateFile /etc/pki/tls/certs/localhost.crt
+# SSLCertificateFile /etc/pki/tls/certs/localhost.crt
+SSLCertificateFile /etc/httpd/conf/ssl.crt/server.crt

 #   Server Private Key:
 #   If the key is not combined with the certificate, use this
 #   directive to point at the key file.  Keep in mind that if
 #   you've both a RSA and a DSA private key you can configure
 #   both in parallel (to also allow the use of DSA ciphers, etc.)
-SSLCertificateKeyFile /etc/pki/tls/private/localhost.key
+# SSLCertificateKeyFile /etc/pki/tls/private/localhost.key
+SSLCertificateKeyFile /etc/httpd/conf/ssl.key/server.key

 #   Server Certificate Chain:
 #   Point SSLCertificateChainFile at a file containing the
クライアント側トラストアンカー設定
オレオレ認証局の証明書をトラストアンカーとして登録
sudo cp /etc/pki/CA/cacert.pem /usr/share/pki/ca-trust-source/anchors/
sudo update-ca-trust
動作確認
echo 'index.html dayo' | sudo tee /var/www/html/index.html

curl https://www1.example.com/
index.html dayoOK
- 80番ポートでないので、
<VirtualHost 192.168.1.1:80>にマッチせず、トップレベルのDocumentRootで設定されている/var/www/htmlのファイルが表示される
今回の証明書はwww1.example.comに対して発行したので、https://www2.example.com/は通信できないことも確認する
curl https://www2.example.com/curl: (51) Unable to communicate securely with peer: requested domain name does not match the server's certificate.OK
Column: SNI(Server Name Indication)
もともと1グローバルアドレスに対してSSL/TLS証明書は1ドメインしか運用できなかった
SNIでこの問題を解消
- SSL/TLS拡張
- RFC6066
- クライアントがサーバにアクセスしたいホスト名を伝えることで、サーバが異なる証明書を使い分けることができる
10.2 Webサーバの監視とメンテナンス
10.2.1 サーバ情報の取得
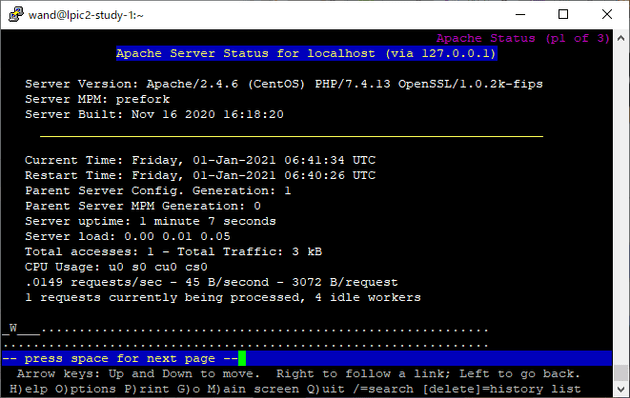
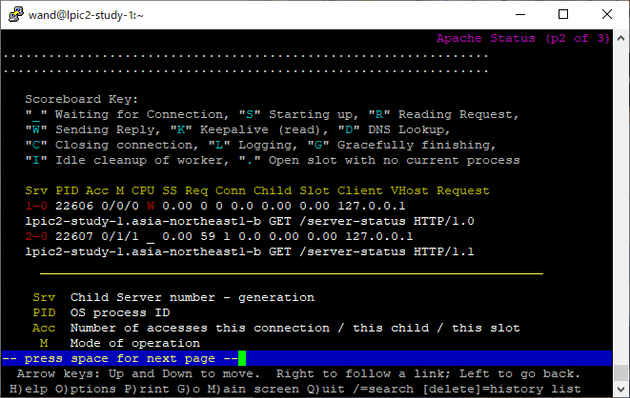
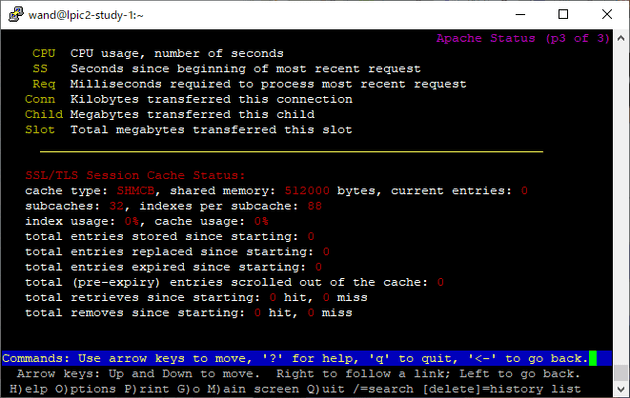
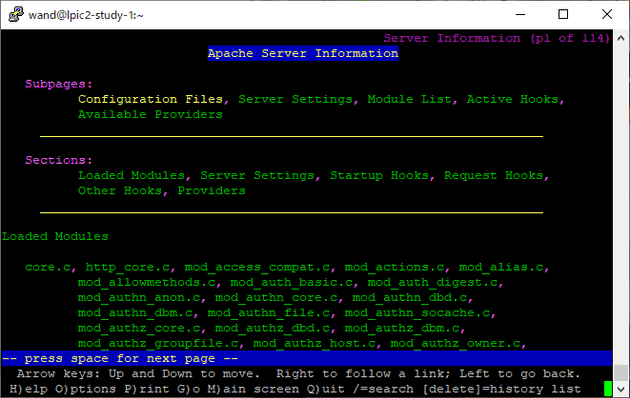
mod_statusモジュールにより稼働状況取得mod_infoモジュールにより設定に関する情報取得
httpd -M | grep -e status status_module (shared)httpd -M | grep -e info info_module (shared)デフォルト有効だったのでhttpd.confの追記のみ
+<Location /server-status>
+  SetHandler server-status
+</Location>
+
+<Location /server-info>
+  SetHandler server-info
+</Location>
設定反映して確認
apachectl configtest
sudo apachectl restart

lynx localhost/server-status
lynx localhost/server-info
server-status
server-info
10.2.2 ログファイル
略 (1/3にて済)
